
CloudPOS

SmartFinance: A Personal Finance App for Budgets, Bills, Savings and Debt

SmartFinance is a personal finance app that puts your budget, bills, savings goals and debt plan in one place. You enter your income and expenses, set limits and goals, and the app shows where your money stands this month. It is a web app that works in your browser on a desktop or laptop and also on mobile, and it supports USD, EUR, GBP, PKR, CAD and AUD.

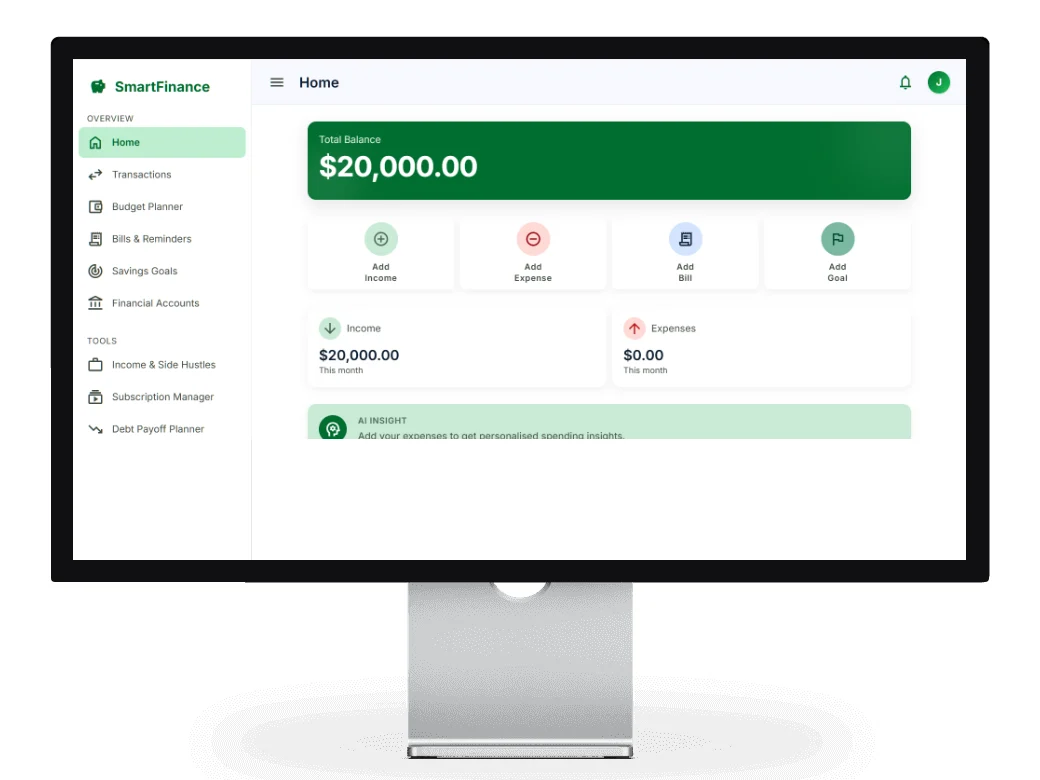
SmartFinance personal finance app home screen with total balance, income and expenses

Screenshots

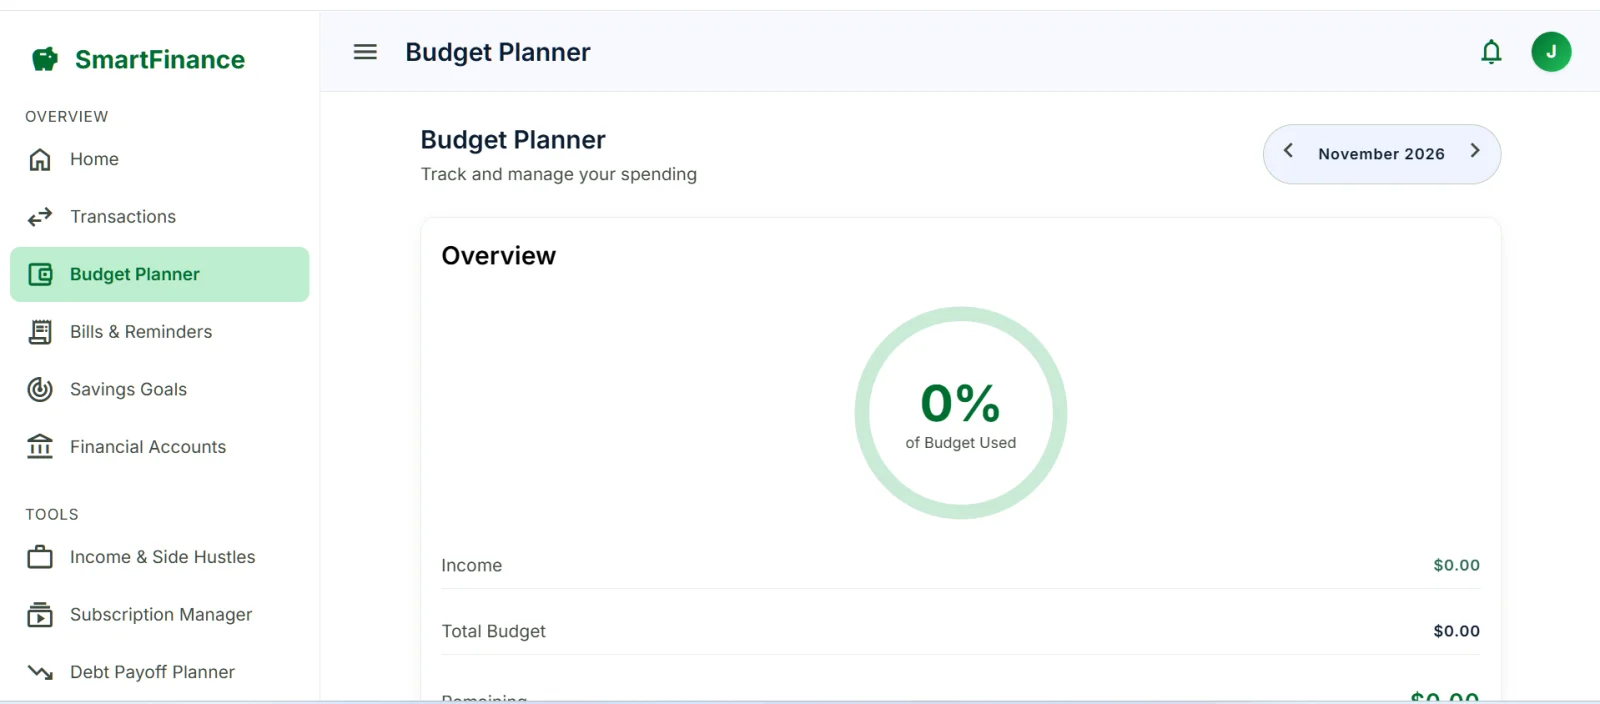
Budget planner app screen in SmartFinance showing the percent of budget used for the month
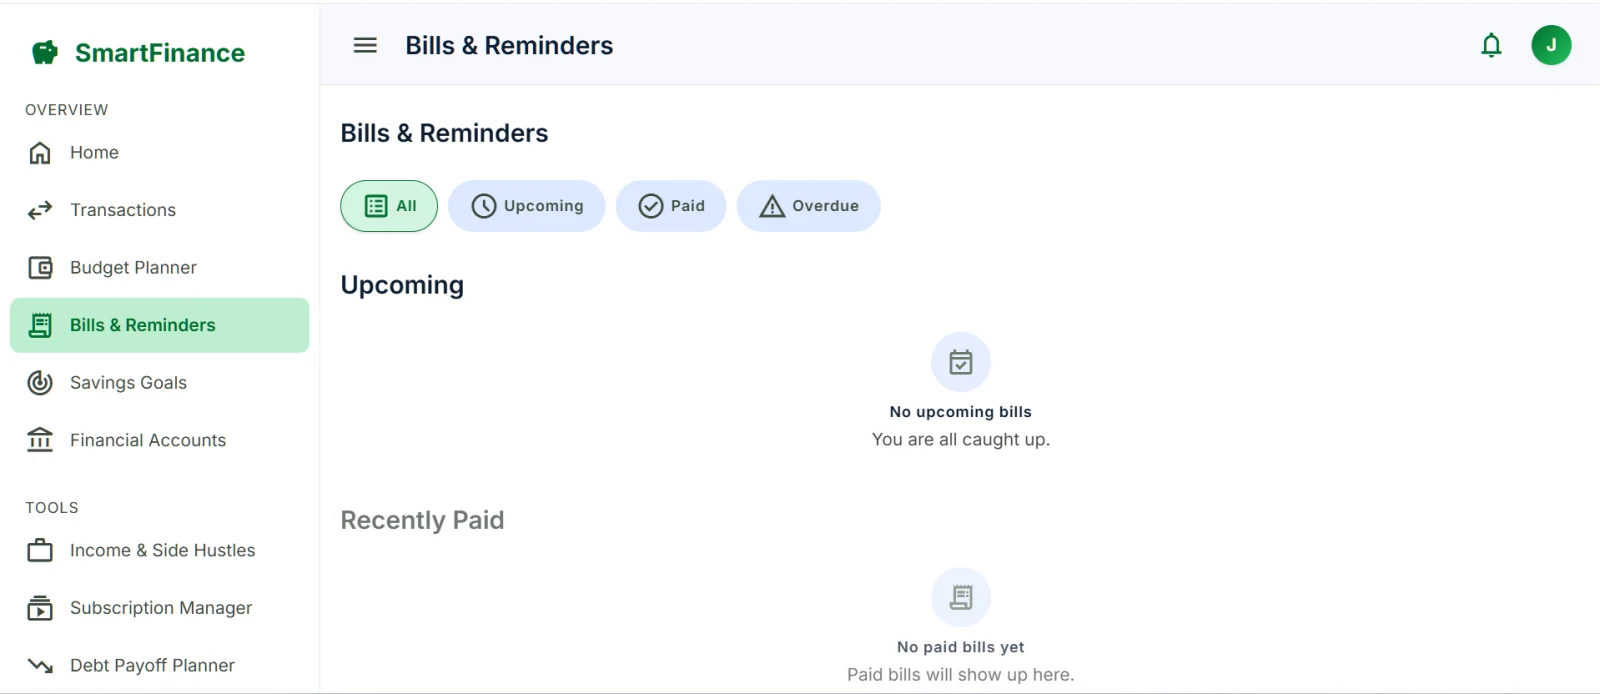
Bill reminder app screen in SmartFinance with All, Upcoming, Paid and Overdue bills
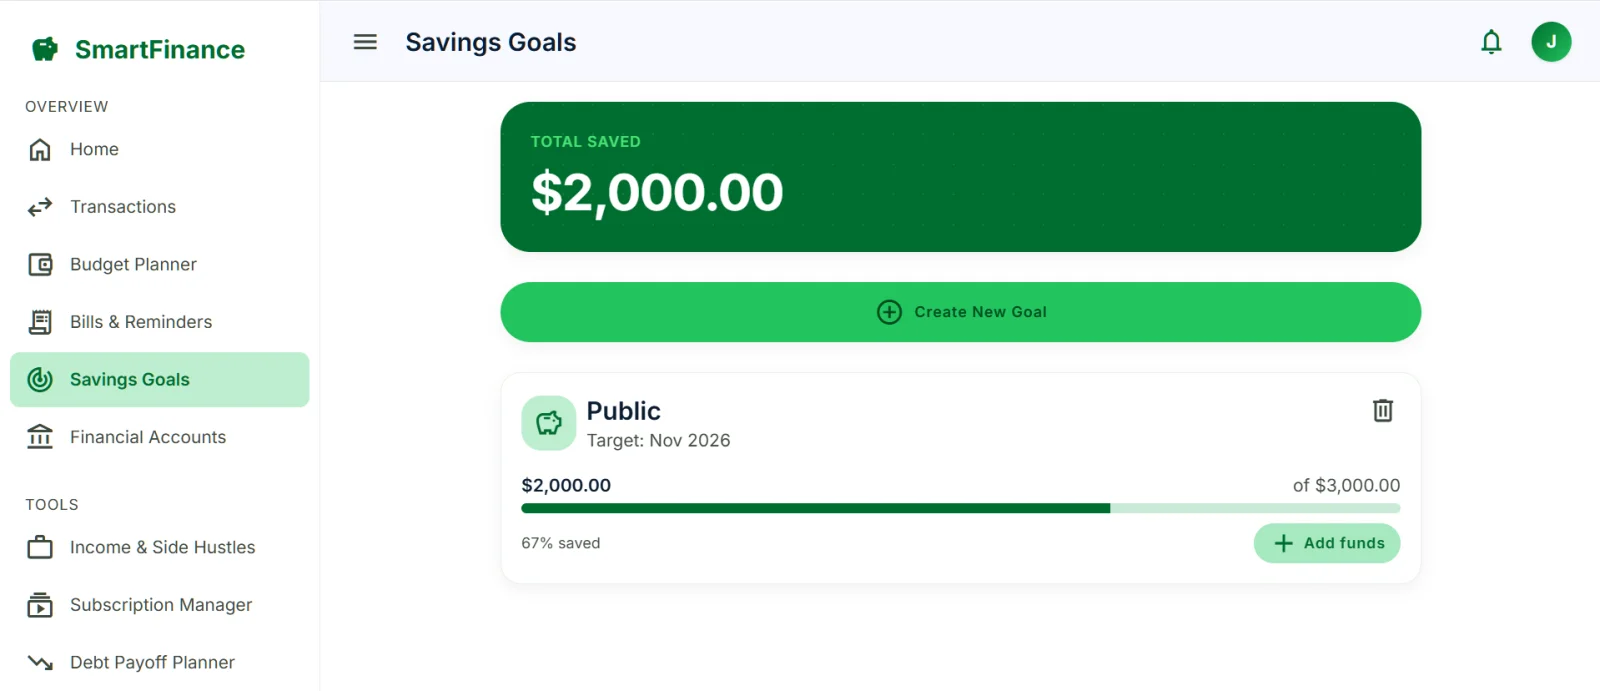
Savings goal tracker screen in SmartFinance with total saved and a goal progress bar
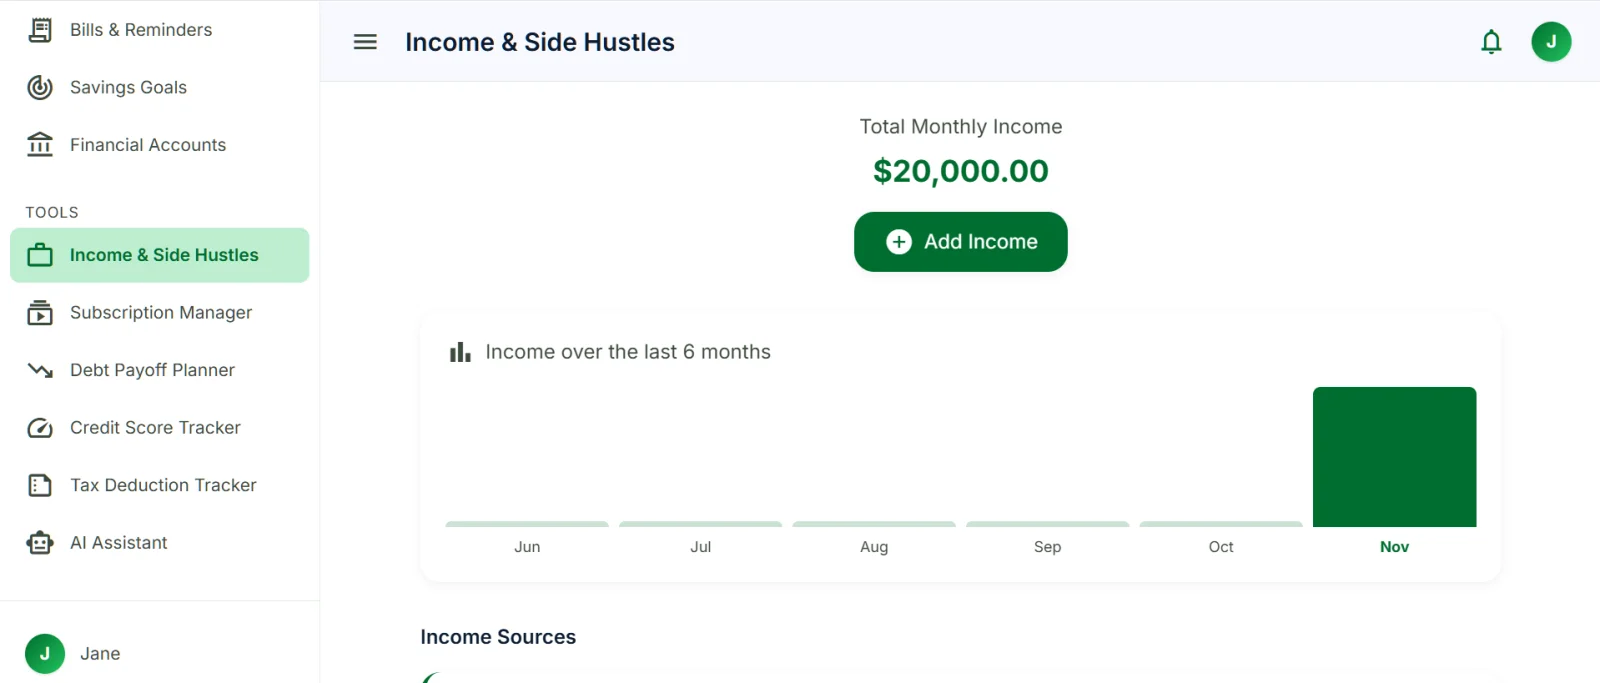
Side hustle income tracker screen in SmartFinance with monthly income and a 6-month chart
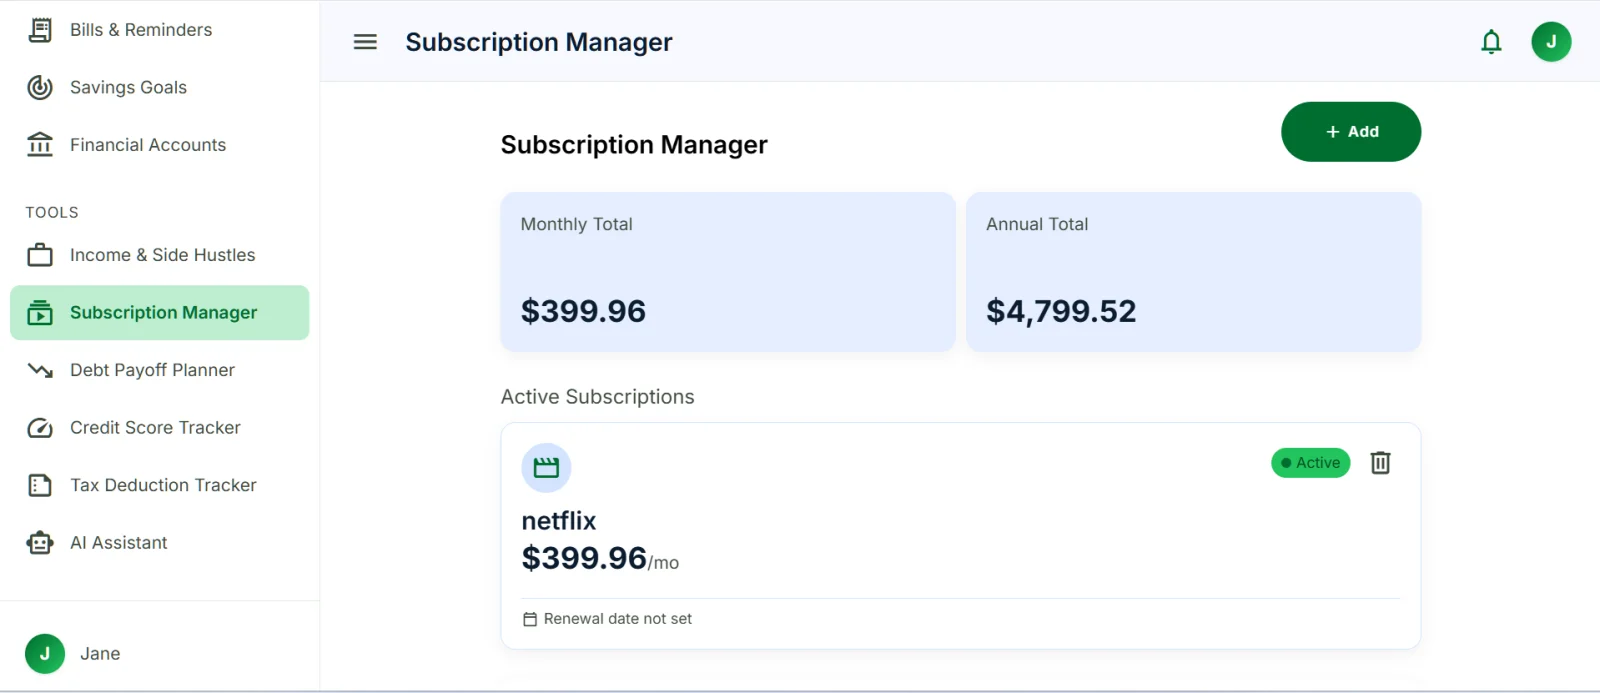
Subscription tracker app screen in SmartFinance with monthly and annual subscription totals
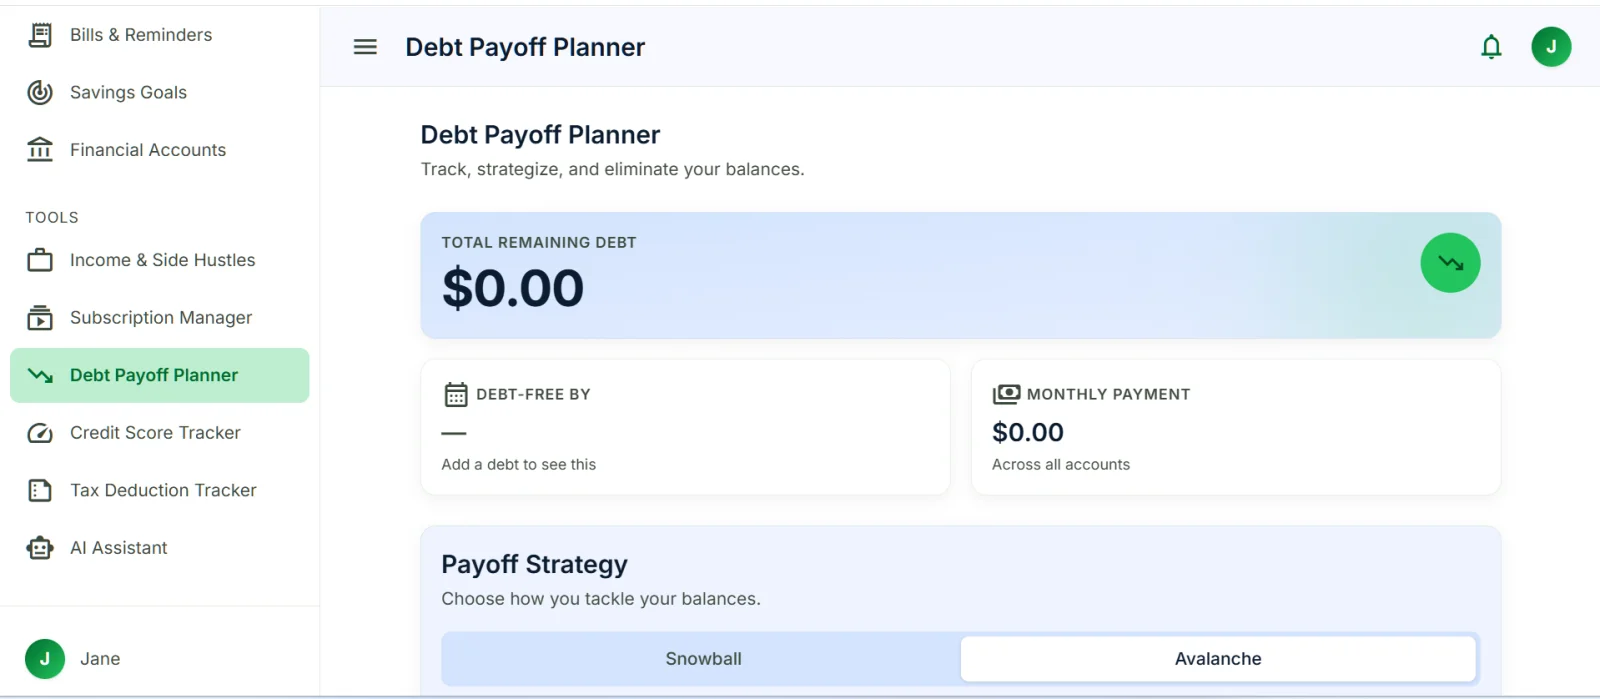
Debt payoff planner screen in SmartFinance with debt-free date and snowball or avalanche strategy
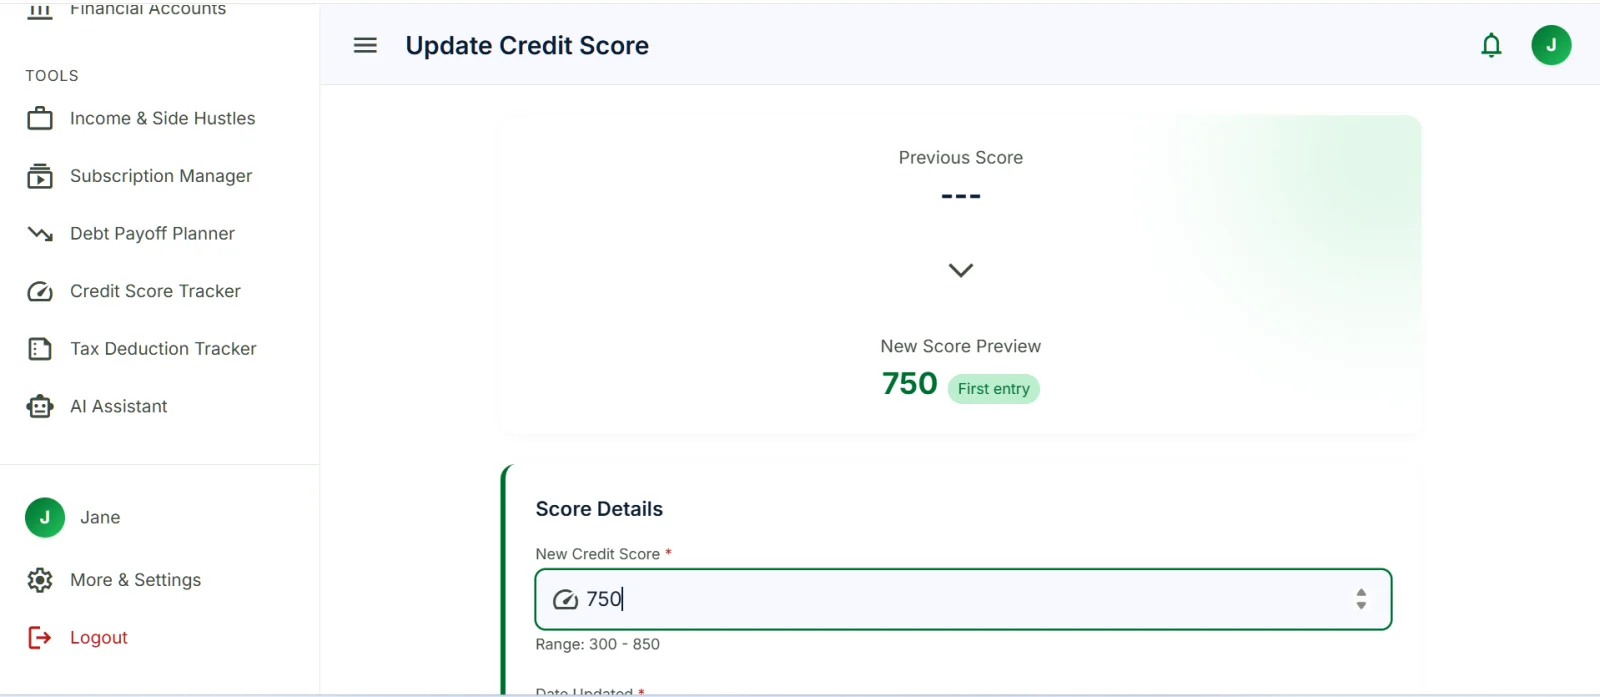
Credit score tracker screen in SmartFinance with previous score and new score preview
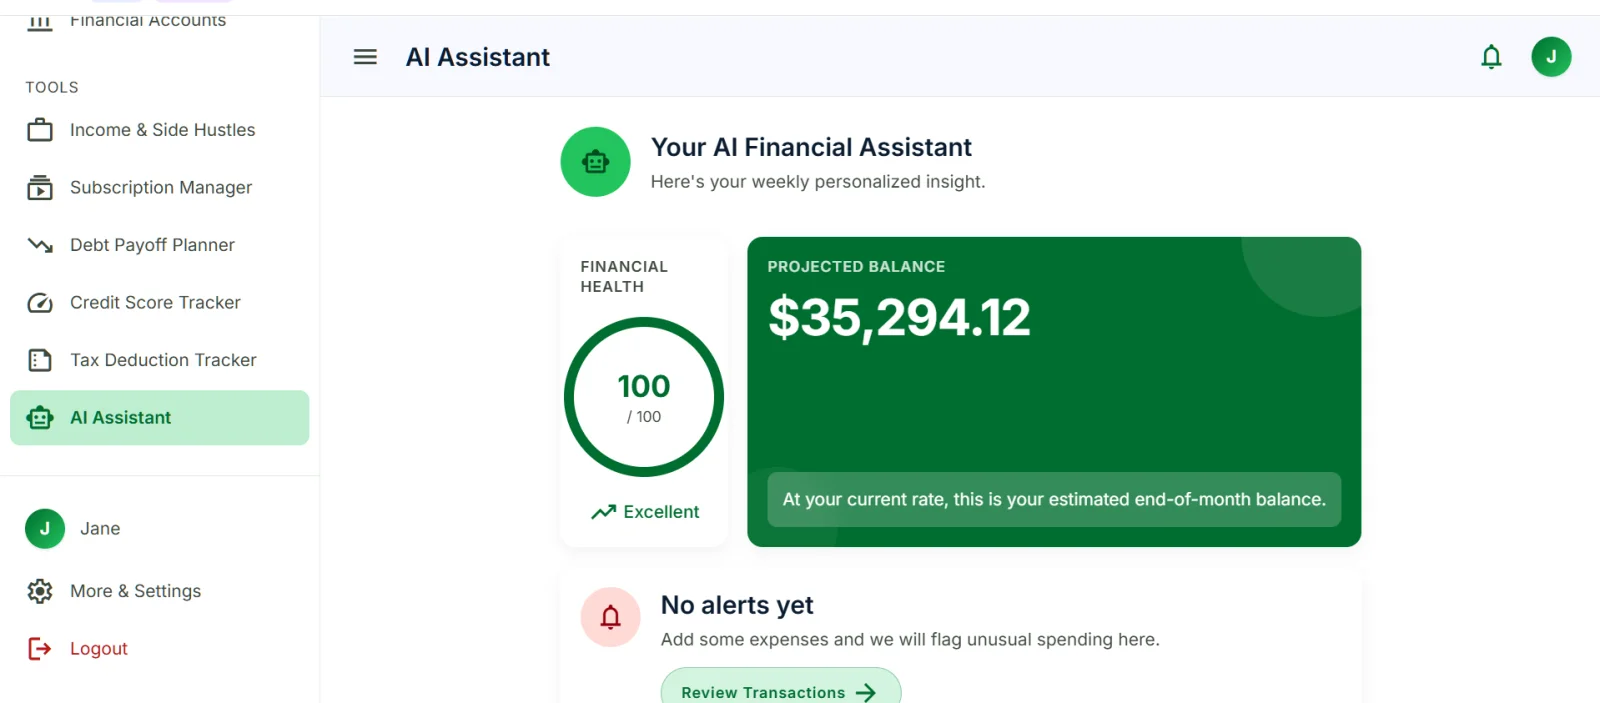
AI financial assistant screen in SmartFinance with financial health score and projected balance

What you can do with SmartFinance

How SmartFinance works

Add your data

Enter your accounts, income, expenses and bills. Everything is entered by hand, so you decide what is tracked.

Set your plan

Create a monthly budget, add recurring bills and set savings goals with target dates.

Check your Home screen

See your balance, this month's income and expenses, upcoming bills, goals and a weekly spending chart.

SmartFinance Features

Explore 11 personal finance tools in one app, including budget planning, bill reminders, savings goals, expense tracking, income management, debt payoff, subscriptions, financial accounts, AI insights, tax records and credit score tracking. Manage your finances with tools designed to keep everything organized in one place.

Budget Planner App: Plan Your Monthly Spending by Category

The SmartFinance Budget Planner helps you decide where your money goes before you spend it. You enter your monthly income, split it into categories such as rent, food and transport, and the app shows how much of your budget you have used and how much is left.

  • Creates a separate budget for each month.
  • Lets you add your own categories and set an amount for each one.
  • Shows your total income, total budget and remaining amount at a glance.
  • Shows the percentage of your budget used so far.
  • Draws a 6-month cash flow chart that compares income and expenses.
  • Can warn you when you are close to a category limit if Budget Alerts are turned on.
How to use it, examples and who it is for

How to create a monthly budget in SmartFinance

  1. Open Budget and tap Create Budget.
  2. Choose the month and enter your monthly income.
  3. Tap Add and create your categories, for example Rent, Food and Transport.
  4. Enter an amount next to each category. Remove any category you do not need.
  5. Check the summary: Total Income, Allocated and Remaining.
  6. Tap Save Budget.

A simple budget example

This is an example with PKR, not real user data.
ItemAmount (PKR)
Monthly income100,000
Rent35,000
Food25,000
Transport10,000
Bills10,000
Savings10,000
Allocated90,000
Remaining10,000

Allocated is the sum of your categories (35,000 + 25,000 + 10,000 + 10,000 + 10,000 = 90,000). Remaining is income minus allocated (100,000 - 90,000 = 10,000). You can give the remaining amount to a goal or keep it as a buffer.

What you see on the Budget screen

  • Month switcher to move between months.
  • Overview: percent of budget used, income, total budget and remaining.
  • Categories: how each category is doing.
  • Cash Flow: income and expenses for the last 6 months.

Who the Budget Planner is for

  • People who run out of money before the end of the month.
  • Families who want a clear limit for food, rent and bills.
  • Freelancers with changing income who want to plan each month again.

Bill Reminder App: Never Miss a Due Date Again

SmartFinance Bills and Reminders keeps all your bills in one list and reminds you before each one is due. Add a bill once, mark it as recurring if it repeats, and the app shows what is upcoming, what is paid and what is overdue.

  • Stores each bill with its amount, category and due date.
  • Repeats bills weekly, bi-weekly, monthly, quarterly or yearly.
  • Sends a reminder 3 days before, 1 week before or on the due date. You can also choose no reminder.
  • Groups bills into All, Upcoming, Paid and Overdue tabs.
  • Keeps a list of recently paid bills.
  • Shows your next bills on the Home screen so you see them every day.
How to use it, examples and who it is for

How to add a bill

  1. Tap Add Bill on the Home screen, or open Bills and add a new bill.
  2. Enter the amount due and the bill name, for example Electricity or Internet.
  3. Pick a category.
  4. Choose the due date.
  5. Turn on Recurring Bill if it repeats, and pick how often.
  6. Choose when you want to be reminded under Remind Me.
  7. Add a note if you need one, then tap Save Bill.

Bill categories you can choose

CategoryTypical examples
UtilityElectricity, gas, water
Rent / MortgageHouse or shop rent, home loan
Internet & PhoneBroadband, mobile package
InsuranceHealth, car, life
SubscriptionStreaming, apps, memberships
Credit CardCard payments
OtherAnything else

Reminder and repeat options

  • Remind Me: 3 days before, 1 week before, on due date, or none.
  • Repeat: weekly, bi-weekly, monthly, quarterly or yearly.
  • Turn on Bill Reminders in More > Notifications to get alerts before a bill is due.

Who Bills and Reminders is for

  • People who pay late fees because they forget a date.
  • Families with many monthly bills such as electricity, gas, internet and school fees.
  • Small business owners who pay rent, utilities and supplier bills on fixed dates.

Savings Goal Tracker: Save for Anything with a Clear Target

The SmartFinance Savings Goals feature turns "I want to save" into a plan with a number and a date. You name the goal, set the target amount and target date, and the app shows how much you have saved and how much is left.

  • Lets you create as many goals as you need, each with its own target.
  • Groups goals by type: Emergency, Travel, Vehicle or Other.
  • Lets you enter an amount you have already saved.
  • Stores a target date and a monthly contribution for each goal.
  • Shows Target, Current and Remaining in a goal summary.
  • Shows your Total Saved across all goals on the Goals screen.
  • Shows your goals on the Home screen so you remember them.
How to use it, examples and who it is for

How to create a savings goal

  1. Tap Add Goal on the Home screen, or open Goals and tap Create New Goal.
  2. Enter a goal name, for example New Car or Vacation.
  3. Pick a category: Emergency, Travel, Vehicle or Other.
  4. Enter the target amount.
  5. Enter Already Saved if you have started (optional).
  6. Choose a target date and a monthly contribution.
  7. Add a note if you like, then tap Save Goal.

A simple savings goal example

This is an example with PKR, not real user data.
ItemAmount (PKR)
Goal: Emergency fundTarget 300,000
Already saved50,000
Remaining250,000
Monthly contribution25,000
Months to reach the goal10

Remaining is the target minus what you saved (300,000 - 50,000 = 250,000). Months to reach the goal is remaining divided by the monthly contribution (250,000 / 25,000 = 10).

Who Savings Goals is for

  • People building an emergency fund.
  • Families saving for a wedding, a trip, school fees or a vehicle.
  • Anyone who finds it hard to save without a target and a date.

Expense Tracker App: Log Every Expense in Seconds

The SmartFinance Expense Tracker lets you record what you spend, add a category and a receipt, and see your spending on a weekly chart. It is built for people who also need to separate work expenses from personal ones, because each expense can carry a business purpose and a tax-deductible mark.

  • Records the amount, date and category of every expense.
  • Lets you add a business purpose, such as Client Meeting.
  • Lets you add an optional description for extra details.
  • Lets you mark an expense as tax deductible for later reporting.
  • Lets you scan or upload a receipt and keep it with the expense.
  • Shows an expense summary (amount, category and tax status) before you save.
  • Shows this month's expenses and a weekly spending chart (Monday to Sunday) on the Home screen.
How to use it, examples and who it is for

How to add an expense

  1. Tap Add Expense on the Home screen.
  2. Enter the amount and the date.
  3. Choose a category.
  4. Add a business purpose and an optional description.
  5. Turn on Tax Deductible if the expense counts for tax reporting.
  6. Tap Scan or Upload Receipt to attach a receipt.
  7. Check the Expense Summary and tap Save Expense.

Expense categories

CategoryExamples
Office SuppliesPaper, printer ink, stationery
MileageFuel or distance for work trips
MealsClient lunch, team meals
TravelTickets, hotels, taxi
SoftwareSubscriptions and tools for work
OtherAnything that does not fit above

Why track expenses every day

  • You see where your money goes before the month ends.
  • You can compare real spending with the limits in your Budget Planner.
  • You keep receipts and business purposes in one place, which helps at tax time.

Who the Expense Tracker is for

  • Freelancers and small business owners who pay for work costs from their own pocket.
  • Employees who need to keep receipts for work expenses.
  • Anyone who wants a quick daily record of spending.

Income and Side Hustle Tracker: See Where Your Money Comes From

The SmartFinance Income and Side Hustles tracker records every payment you receive, from a monthly salary to a small freelance job. You see your total monthly income, your income sources and a 6-month chart, so you know how steady your earnings are.

  • Records income with a source, type, date, payment method and note.
  • Supports five income types: Salary, Freelance, Side Hustle, Investments and Other.
  • Shows your total monthly income.
  • Draws an income chart for the last 6 months.
  • Lists your income sources for the current month.
  • Shows a monthly summary of income, expenses and the net result.
  • Keeps a list of recent income activity.
How to use it, examples and who it is for

How to add income

  1. Tap Add Income on the Home screen, or open Income & Side Hustles and tap Add Income.
  2. Enter the amount.
  3. Enter the source, for example the name of your employer or client.
  4. Choose the income type.
  5. Pick the date and the payment method (Bank Transfer, Cash or Cryptocurrency).
  6. Add a note if needed, then tap Save Income.

Income types explained

TypeUse it for
SalaryRegular pay from a job
FreelanceProject or client payments
Side HustleExtra work such as selling, tutoring or small gigs
InvestmentsReturns from investments
OtherGifts, refunds or anything else

Why track side hustle income

  • You see how much your extra work really adds each month.
  • You can plan a budget around your lowest months instead of your best month.
  • You have a clear record of income when you need it.

Who the Income tracker is for

  • Freelancers and people with more than one income source.
  • Employees with a side business or part-time work.
  • Anyone whose income changes from month to month.

Debt Payoff Planner: Snowball vs Avalanche, Step by Step

The SmartFinance Debt Payoff Planner helps you decide which debt to pay first. You add each debt with its balance, interest rate and minimum payment, choose the snowball or avalanche method, and the app shows your total remaining debt, your monthly payment and your debt-free date.

  • Stores each debt with its balance, interest rate (APR) and minimum payment.
  • Shows total remaining debt and the total monthly payment across all debts.
  • Shows a Debt-Free By date once you add a debt.
  • Lets you choose the Snowball or Avalanche strategy.
  • Suggests a Smart Choice and explains it. For example, the Avalanche method targets the highest interest first.
  • Draws a payoff projection chart.
  • Has a Calculate Payoff button and an Edit Monthly Budget option.
  • Updates your net worth and monthly budget numbers when you add a debt.
How to use it, examples and who it is for

How to add a debt and plan your payoff

  1. Open Debt Payoff Planner from More and tap Add Debt.
  2. Enter the debt or account name, for example a credit card or a loan.
  3. Enter the current balance, the interest rate (APR) and the minimum payment.
  4. Check the summary projection: total balance added and estimated monthly cost.
  5. Tap Save Debt. Repeat for every debt you have.
  6. Choose Snowball or Avalanche and tap Calculate Payoff.
  7. Read your debt-free date and the payoff projection.

Snowball vs Avalanche: what is the difference?

Both methods work the same way at first: you pay the minimum on every debt, then put any extra money on one debt. The only difference is which debt gets the extra money.

SnowballAvalanche
Which debt firstSmallest balanceHighest interest rate
Main benefitQuick wins and motivationUsually less total interest
Best forPeople who need early progressPeople who want the lowest cost
Example (amounts in PKR, not real user data):
DebtBalanceAPR
Card A20,00030%
Card B5,00015%
Loan C50,00010%
Snowball order: Card B (5,000) first, then Card A (20,000), then Loan C (50,000).
Avalanche order: Card A (30%) first, then Card B (15%), then Loan C (10%).

When one debt is paid off, its payment moves to the next debt in the list. That is how the payments "roll" forward.

Who the Debt Payoff Planner is for

  • People with more than one credit card or loan.
  • Anyone who pays only the minimum and wants a clearer plan.
  • Anyone who wants to know a realistic debt-free date.

Subscription Tracker App: Know What You Pay Every Month and Year

The SmartFinance Subscription Manager keeps all your recurring payments in one list, such as streaming, apps, software and gym memberships. You add the price, billing cycle and next renewal date, and the app shows your monthly total and annual total so small charges do not surprise you.

SmartFinance tracks your subscriptions. It does not cancel them for you, so you still cancel inside each service.

  • Stores each subscription with its name, category, price and billing cycle.
  • Supports weekly, monthly, quarterly and yearly billing.
  • Stores the next renewal date and the payment method.
  • Can remind you 3 days before a charge.
  • Shows your monthly total and annual total.
  • Shows an estimated cost summary (monthly and annual) while you add a subscription.
  • Lists all your active subscriptions in one place.
How to use it, examples and who it is for

How to add a subscription

  1. Open Subscription Manager from More and tap Add.
  2. Enter the service name, for example Netflix or Spotify.
  3. Choose a category.
  4. Enter the price and the billing frequency.
  5. Choose the next renewal date and the payment method.
  6. Turn on the renewal reminder if you want a reminder 3 days before the charge.
  7. Add a note if needed, then tap Save Subscription.

Categories and payment methods

CategoriesPayment methods
EntertainmentDebit / Credit card
Software & ToolsBank account
UtilitiesMobile wallet
Health & FitnessCash
OtherOther

How to read your subscription total

This is an example with PKR, not real user data.
SubscriptionPrice (PKR)BillingCost per year (PKR)
Streaming1,200Monthly14,400
Gym app900Monthly10,800
Cloud storage3,000Yearly3,000
Total28,200

A yearly cost of 28,200 equals about 2,350 per month (28,200 / 12). Seeing the yearly number helps you decide which services are worth keeping.

Who the Subscription Manager is for

  • People who pay for several apps and streaming services.
  • Freelancers who pay for software tools every month or year.
  • Anyone who has been charged for a renewal they forgot.

Track All Your Accounts in One App

SmartFinance Financial Accounts gives you one list for every account you use: checking, savings, credit cards, investments and loans. You add each account and its current balance, and the app shows your total balance, so you do not need to open five different apps to see where you stand.

  • Stores each account with a name, type and current balance.
  • Supports six account types: Checking, Savings, Credit Card, Investment, Loan and Other.
  • Lets you add the last 4 digits of an account to tell similar accounts apart (optional).
  • Shows your total balance at the top of the list.
  • Works with manual entry, so you choose which accounts to add and keep each balance up to date yourself.
How to use it, examples and who it is for

How to add an account

  1. Open Financial Accounts from the More menu and tap Add Account.
  2. Enter an account name, for example "My Savings Account" or "Cash in hand".
  3. Choose the account type.
  4. Add the last 4 digits if you want to (optional).
  5. Enter the current balance.
  6. Tap Save Account.

Account types explained

TypeUse it for
CheckingYour everyday bank account
SavingsSavings accounts and saved cash
Credit CardCredit card balances
InvestmentInvestment accounts
LoanLoans you are repaying
OtherAnything else, such as a wallet or cash

Why keep your accounts in one list

  • You see your full picture instead of one account at a time.
  • Your savings goals and budget are easier to plan when you know your total balance.
  • A single list makes it easier to notice which accounts you rarely use.

Who Financial Accounts is for

  • People with accounts in more than one bank or wallet.
  • People who want a simple overview and do not want to share bank logins.
  • Anyone who tracks both savings and loans.

AI Financial Assistant: Your Financial Health Score and Weekly Insights

The SmartFinance AI Assistant turns the numbers you enter into a clear picture. It gives you a financial health score from 0 to 100, a projected balance and alerts for unusual spending, plus a weekly personalized insight. The more income, expenses and bills you add, the more useful it becomes.

  • Financial Health score (0 to 100). It combines your budget adherence, your savings rate and your bill payment history.
  • Projected balance. An estimate of where your balance is heading, based on this month's activity.
  • Alerts. SmartFinance flags unusual spending so you can review it.
  • Weekly insight. A personalized note about your money for the week.
  • Review Transactions shortcut to check the entries behind an alert.
  • AI Insight card on the Home screen with spending tips based on your expenses.
How to use it, examples and who it is for

How to get your score and insights

  1. Add your income and your expenses for the month.
  2. Create a monthly budget and add your bills.
  3. Open AI Assistant from More.
  4. Read your Financial Health score and your projected balance.
  5. Open Review Transactions if you see an alert.

How the financial health score is built

Part of the scoreWhat it looks at
Budget adherenceWhether your spending stays inside your budget
Savings rateHow much of your income you save
Bill payment historyWhether you pay your bills on time

Who the AI Assistant is for

  • People who want a quick check of their money health without reading charts.
  • People who want to catch unusual spending early.
  • Anyone who wants a simple number to improve month by month.

Tax Deduction Tracker: Keep Deductible Expenses and Receipts Ready

The SmartFinance Tax Deduction Tracker collects every expense you mark as tax deductible in one place. You see your total estimated deductions, a breakdown by category and a Q1 to Q4 summary, and you can export and share your records when you need them. In the app, this screen is also reachable from the Export Reports item in the More menu.

SmartFinance helps you keep records. It is not tax advice, and tax rules differ by country. Check the rules that apply to you or ask a tax professional.
  • Shows your total estimated deductions.
  • Shows how many deductible expenses you have recorded.
  • Breaks deductions down by category.
  • Lists your recent deductible expenses.
  • Gives an annual summary from Q1 to Q4.
  • Lets you export and share your records.
  • Keeps the business purpose and the receipt attached to each expense.
How to use it, examples and who it is for

How to track a deductible expense

  1. Tap Add Expense on the Home screen.
  2. Enter the amount, date and category.
  3. Write the business purpose, for example "Client meeting".
  4. Turn on Tax Deductible ("Mark for tax reporting").
  5. Tap Scan or Upload Receipt and attach the receipt.
  6. Tap Save Expense.
  7. Open Export Reports in the More menu to see it in the Tax Deduction Tracker.

Deductible expense categories in SmartFinance

CategoryExamples
Office SuppliesStationery, printer paper
MileageDistance or fuel costs for work trips
MealsBusiness meals with clients
TravelWork tickets, hotels, taxis
SoftwareTools and subscriptions used for work
OtherOther work-related costs

How to export your records

Open the Tax Deduction Tracker (More > Export Reports) and tap Export & Share to share your records. Use the Q1 to Q4 summary to check each quarter before you share.

Why record deductible expenses all year

  • You do not need to search old messages and bags of receipts at the end of the year.
  • A business purpose and a receipt on each expense make your records clearer.
  • The quarterly view shows which months you spent the most on work costs.

Who the Tax Deduction Tracker is for

  • Freelancers and self-employed people.
  • Small business owners who pay work costs personally.
  • Employees who keep records of work expenses.

Credit Score Tracker: Record Your Score and See How It Changes

The SmartFinance Credit Score Tracker lets you record your credit score each time you check it, see your history and read simple tips to improve it. You enter the score yourself, using a range from 300 to 850, and add a short note about what changed.

SmartFinance does not pull your score from a credit bureau. You enter the number you get from your own provider. Score ranges and credit systems differ by country, so use the number your provider shows you.
  • Stores each credit score with the date you checked it.
  • Accepts scores in the 300 to 850 range.
  • Shows your previous score and a new score preview when you update.
  • Keeps a score history of your last 6 updates.
  • Lets you add notes and quick tags: Paid off debt, Hard inquiry and Limit increase.
  • Shows improvement tips inside the screen.
How to use it, examples and who it is for

How to record your credit score

  1. Open Credit Score Tracker from the More menu.
  2. Tap Add Credit Score.
  3. Enter your new credit score (300 to 850).
  4. Choose the date updated.
  5. Add a note or tap a quick tag if something changed, for example Paid off debt.
  6. Tap Save Update.

Two improvement tips in the app

  • Keep old accounts open. Closing old accounts reduces your average credit age, so keep your oldest card active.
  • Request a credit limit increase. Asking for a higher limit without using it can lower your overall utilization rate.

Why track your score over time

  • You can see whether paying off a debt or opening a new card changed your score.
  • Notes explain why a number moved, so you remember it later.
  • A history of updates is easier to read than a single number.

Who the Credit Score Tracker is for

  • People who check their credit score regularly and want to keep a record.
  • People paying off debt who want to see progress.
  • Anyone preparing to apply for a loan or a credit card.

Who SmartFinance is for

Salaried people

People with a salary who want a simple monthly budget.

Freelancers and side hustlers

Freelancers and side hustlers who track income and business expenses.

People paying off debt

Anyone paying off a credit card or loan who wants a clear plan.

Anyone who forgets due dates

Anyone who forgets bill due dates or subscription renewals.

Frequently asked questions

SmartFinance is a personal finance app for budgeting, bill reminders, savings goals, debt payoff planning and expense tracking in one place.

Yes. You add your accounts, income, expenses and bills yourself, so you stay in control of your data.

USD, EUR, GBP, PKR, CAD and AUD. You can change the currency from More > Currency.

Yes. SmartFinance is a web app that works in the browser on your desktop or laptop, and it is also available as a mobile app.

Ready to Try SmartFinance?

Plan your budget, track bills, build savings goals and pay off debt in one simple finance app. Book a free demo to see how SmartFinance works on the web and on your phone.

Book a Free Demo
WhatsApp Us